Contents of the Manage Contracts Screen
Use the fields and options to configure the Manage Contracts screen.
Contents
Use this group box to specify the contract ID, and the opportunity and prime contract number that you want to associate with this contract.
| Field | Description | ||||||||||||
|---|---|---|---|---|---|---|---|---|---|---|---|---|---|
| Contract ID | Enter a unique ID to identify the contract, or leave this field blank to have Costpoint automatically assign an ID if the Auto-Assign Contract IDs checkbox is selected on the Configure Contract Management Settings screen. | ||||||||||||
| Name | Enter a description or name for the contract ID.
If you have set up Company Default contract defaults, Costpoint automatically populates relevant fields in Manage Contracts based on defaults specified on the Manage Contract Defaults screen. Note, however, that defaults from the main opportunity linked to the contract still take precedence over defaults indicated in Manage Contract Defaults. For more information on the triggers and how Costpoint populates contract defaults, see Contract Default Triggers and Process Flow. |
||||||||||||
| Costpoint Opportunity | Select this checkbox to have Costpoint validate the opportunity that you want to associate with the contract. When you select this checkbox, the lookup for Main Opportunity ID will display all opportunities available on the Manage Opportunities screen, and Costpoint will validate the opportunity you selected. If you do not select this checkbox, you can manually enter any opportunity ID and name, and no validation will take place. | ||||||||||||
| Exclude from Reports | Select this checkbox to exclude the contract from reports available in the Capture & Contracts domain. This is important when you need to generate reports and exclude certain types of contracts (for example, indefinite delivery/indefinite quantity and blanket purchase agreement contracts or subcontracts) to avoid overstating the reports. | ||||||||||||
| Main Opportunity ID |
Enter, or click
|
||||||||||||
| Name | Enter, or click
 to select, the main opportunity name. Once you save the record, the opportunity name displays as a hyperlink that you can click to open the Manage Opportunities screen. For a Costpoint opportunity, the screen opens with existing values for that opportunity. For a non-Costpoint opportunity, the screen displays a blank record that you can fill in with details for that opportunity. to select, the main opportunity name. Once you save the record, the opportunity name displays as a hyperlink that you can click to open the Manage Opportunities screen. For a Costpoint opportunity, the screen opens with existing values for that opportunity. For a non-Costpoint opportunity, the screen displays a blank record that you can fill in with details for that opportunity.
|
||||||||||||
| Prime Contract No |
Enter the prime contract number (the number on the signed contract with the customer) that you want to associate with the contract ID. If the main opportunity linked to the contract is a Costpoint opportunity, this field defaults to the prime contract number associated with the opportunity in Manage Opportunities, but can be edited. If you have parent-child contract records, the value in this field serves as the parent and the Task Order No value on the General tab serves as the child. This is important when you want to link Indefinite Delivery/Indefinite Quantity (IDIQ) and Blanket Purchase Agreement (BPA) type contracts to contracts awarded under these higher-level types of contracts. |
||||||||||||
| Name |
Enter a description or name for the prime contract number. If the main opportunity linked to the contract is a Costpoint opportunity, this field defaults to the prime contract name in Manage Opportunities, but can be edited. |
||||||||||||
| Record Status |
Select the record status of the contract. Valid values are Active and Inactive. If you select Inactive, this contract will not be available in the lookup within a subcontract record, but you can manually enter the contract ID. In addition, you will not be able to initialize a project from this contract on the Project Initialization subtask. Project initialization is allowed only for active contracts. If this contract is active and linked to a subcontract and/or project, and you updated its record status to Inactive, the subcontract and/or project will remain linked to this contract. |
||||||||||||
| Average Rating | This field displays the average rating (in percentage) of all performance assessments for this contract record. Costpoint uses the Total Score Percent values on the Performance Assessment tab in the calculation. | ||||||||||||
| Use Planning |
This checkbox displays only if you are licensed for Costpoint Planning. Select this checkbox if you want to leverage resource information in project budgets in the Planning domain in setting up team information for the contract. If you select this checkbox and the contract is linked to a project budget in Planning, resources added to the project budget can be viewed on the Project Budget Resources subtask. You would also be able to open the contract from within the project budget. The Project Budget Resources subtask on the Team tab is available only if this checkbox is selected. All resources displayed on this subtask come directly from Planning, and you will not be able to delete any records. Regardless of how Use Planning is set, you will be able to manually enter records on the Potential Resource Details subtask (also on the Team tab), or load resources from the linked opportunity record. You can also modify or delete records on the Potential Resource Details subtask. The following table summarizes the actions and their results when the Use Planning checkbox is selected or cleared.
Attention: For details on how resource information is shared between the
Capture & Contracts and Planning domains, see
Opportunity and Contract Teams and Integration with Planning.
|
||||||||||||
| Smart Summary |
The Smart Summary button is available only if the Enable Dela checkbox is selected on the Configure System Settings screen. Click this button to generate a smart summary of the details for the contract record. The report displays on a popup screen with information on the following sections:
Other features on the popup screen include the following:
Here is an example of the generated smart summary: 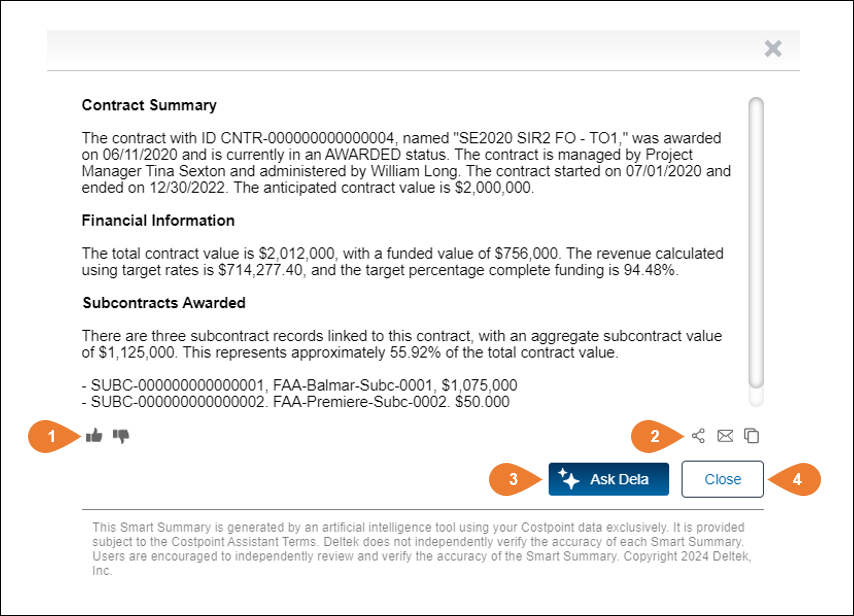
|